Thursday, May 31, 2012

Not your average salad

Remember my spiel about salads? Right.


Well here is another reminder that salads don't have to be boring! Or limp. Or soggy. This salad is about as crunchy and zippy as it gets. Lemon juice, vinegar, and jalapeños for brightness, corn and cabbage for crunch, all cooled off by some tomatoes. We have ourselves a winner!

Isn't cabbage pretty?
Oh, do some of those ingredients look familiar? Ya, I haven't been to the grocery store... so I am in throwing-together-what-I-have mode. Also because I have been trying my hardest to use everything from one grocery trip before going again to avoid wasting food. Well turns out 1 head of cabbage takes me forever to get rid of, so the cabbage you see popping up in all my recipes all hails from the same head of cabbage. I have begged cabbage-loving R to take it off my hands... but lately I think he has had enough of eating foods that leak red color into him (the same guy who complains that beets taste like dirt has been drinking beet/dirt juice nightly... at least when he isn't too busy making oatmeal smoothies?? I don't know about that one...). And the lemon juice you see in the recipe? Oh, just from a lemon that I GREW. NBD. I have a meyer lemon tree as part of my balcony oasis, and said little lemon tree currently has roughly 30 itty bitty teeny weeny little lemons on it!

Expect lot so of lemon recipes this summer...
Anyways, if it means eating this salad every night until the cabbage is done, then I am A-OK with that!


Spicy Cabbage and Corn Salad

Materials:

  • 1/4 head red cabbage, shredded
  • Fresh kernels from 1 ear of corn
  • handful of cherry tomatoes, halved
  • 1 jalapeño, deseeded and sliced thin
  • Juice from 1 meyer lemon
  • 1 tablespoon white wine vinegar
  • 1 heaping tablespoon fresh chopped mint
  • salt and pepper to taste
Methods:

  1. Toss all of the above ingredients together.
  2. Enjoy!

Fridge pizza

Pizza gets a bad rap for being junk food. And sure, there is a lot of oily, cheesy, heavy junk food pizza out there... but it doesn't have to be. One of the great things about pizza is that there are no rules, so why not make it healthy? You can pile it high with vegetables and serve it on a whole wheat crust... that is definitely not junk food.


It should be known by the on-line community here, that I make a pretty mean pizza. My mom also makes a mean pizza, and this is a skill I inherited, luckily. Anything from the standard peppers and caramelized onions to kale and sweet potato. Some of the best pizza I have ever made, however, comes out of the cast iron skillet at the Maine house. Usually topped with pesto, garlic, onions, and cheese (or leftover taco ingredients) and enjoyed with a spicy marg on the balcony. Heaven.

Today, we are going to use a ball of pizza dough I stashed in the freezer a few weeks ago and some leftovers that I have in the fridge. Cabbage left from cactus tacos? Going on the pizza. Chipotle cashew cream from brunch? On the pizza. Bell pepper not used in tofu scramble? You betcha! Worst case scenario, it is a gorgeous pizza.


Luckily, it was both gorgeous AND delicious! Cooking win.


Cabbage, Pepper, and Caramelized Onion Pizza

Materials

  • 1 ball your favorite pizza dough
  • olive oil
  • 1/2 onion
  • 2 tablespoons sugar
  • 1/4 head of cabbage, sliced thin
  • 1 orange bell pepper, sliced thin
  • shredded cheese (optional)
    • Note: I only used cheese because my roommate recently moved out and left a bunch of cheese in the fridge that I don't want to go to waste.
Methods:

  1. Preheat the oven to 450 and lightly grease cast iron skillet.
  2. Spread out pizza dough in skillet.
  3. Heat some olive oil over medium heat in a nonstick skillet.
  4. Add the onions, sugar, and a sprinkle of salt.
  5. Cook for about 10 minutes until the onions are soft.
  6. If using, spread cheese out on dough, cover with caramelized onions, top with cabbage and bell pepper.
  7. Put in the oven for about 15-20 minutes.
  8. Enjoy!


Wednesday, May 23, 2012

I eat barbecue sauce with a spoon.

Really. It's a problem.


People usually can't wrap their mind around a vegetarian with such an obsession with barbecue sauce, but alas, you are reading the words of (and then hopefully making the food from) one. I can't even tell you what it is that I love about it. Everything, maybe? I'm not super picky... if the label even hints that it is barbecue sauce, then get me a spoon. Stat. Lest I use my hands.

And I suppose eating sauce from the jar with my hands is probably not lady like (who is this girl?!).

Luckily, I had some tofu sliced up and ready to go when I grabbed the barbecue sauce this weekend.


I also had some tomatoes roasting in the oven, and some leeks sliced up... and some grits cooking. I didn't have much of a plan, but this dish came together SO nicely! It was the perfect Sunday night dinner after spending the day planting a garden on my balcony.

I've one to Scarborough Fair....Parsley, Sage, Rosemary, and Thyme
The BBQ tofu is simple and classic, and the grits are there to catch any stray barbecue sauce. The caramelized leeks on top give it a nice crunch, and the tomatoes daintily sit atop every bite, doling out their burst of sweetness. Also, you can make all the components at the same time... so even though it seems complex, it really is still a 30 minute meal. Huzzah!

BBQ Tofu 
with Grits, Roasted Tomatoes, and Caramelized Leeks

Materials:
  • Olive oil
  • 4 campari tomatoes, halved with seeds removed (or whatever you have)
  • 3/4 cup water
  • 1/4 cup grits 
  • 1/4 soy milk
  • 1 leek, sliced and cleaned
  • 8 oz extra firm tofu
  • 1/2 cup barbecue sauce


Methods:
For the tomatoes

  1. Preheat the oven to 450.
  2. Place the tomato halves on a lined baking sheet with a drizzle of olive oil and a shake of salt, and place in the oven for roughly 30 minutes.
For the grits

  1. Bring the water to a boil in small sauce pan.
  2. Add the grits, return to a boil, and then turn down to very low.
  3. Cook covered, with frequent stirring, for 15 minutes.
  4. Stir in the soy milk, and continue cooking for 5-10 minutes. 
  5. Add salt and pepper to taste
For the leeks

  1. While the grits are cooking, heat up some olive oil in a small skillet over medium heat and add the leeks.
  2. Sprinkle the leeks with salt, and then cook over low for about 20 minutes, until tender.
For the tofu

  1. Heat up some olive oil in a nonstick skillet over medium-high heat.
  2. Add the tofu and allow to sear for about 7 minutes per side. 
  3. Pour in the barbecue sauce, making sure each piece is nicely coated.
  4. Cook for additional 5 minutes. 


Monday, May 21, 2012

Man food

Warm weather has been filling the spring air lately, and BBQs are filling my calendar. I was searching for something to bring to a department BBQ, when I stumbled across jalapeño beer cornbread. Could there be anything more perfect for a BeerBBQ?


I'm going to be upfront with you, I cheated a little bit. Trader Joe's was conveniently on my errand route Sunday morning, so I stopped in there hoping to get the ingredients for the cornbread.  I should have known that TJ's wouldn't have cornmeal, though. I grabbed the jalapeños, I grabbed some honey... and then I wandered aimlessly, whilst mustering the energy to add another stop on my way home to get cornmeal and thinking, "well this is inconvenient."


Then I passed the boxed mixes section. I mean, it wouldn't hurt to at least look at the box of cornbread mix, right? Ok, so the ingredients listed are basically flour, cornmeal, baking powder, and sugar... so it isn't so much a box mix as someone just already mixed my dry ingredients together for me. How nice of them?!


So there you have it. I doctored up a Trader Joe's cornbread mix to make this cornbread.

MOVING ON. What makes this cornbread truly amazing is the doctoring up... the beer and the jalapeños, to be more specific. Seriously, this manly hunk of bread basically left the toilet seat up and then sat on my couch farting. The beer adds a super interesting flavor, while the jalapeños give it a really nice kick that sort of lingers on your lips. Another huge perk? Check out that ingredient list: just about 5 ingredients (most of which I know you have or can easily have), uses a store-bought mix, and has jalapeños in it... you can totally handle that!


Not convinced yet? When I slathered a piece with honey and handed it to rejoicing R, he seriously just stood there smiling at me for a good 5 minutes, sort of dumbfounded by the epiphany that was occurring in his mouth at that moment. He then spent literally the rest of the day talking about this cornbread. Well, at least when he wasn't suggesting we sneak cinnabons into a movie we were going to see that night... and telling me how he used to pack peanut butter and jelly sandwiches to bring to parties in college.

Anyways, bring this to your next social gathering, and I promise everyone will love you for it!

But aren't I your honey?!
Jalapeño Beer Cornbread
Inspired by Cosmo Cookie 


Materials:
  • 1 box cornbread mix (Trader Joe's, preferably) 
  • 1 flax egg
  • 1/2 cup beer (I used Sierra Nevada Ruthless Rye, my current favorite)
  • 1/2 cup soy milk
  • 1/4 cup vegetable oil
  • 2 jalapeños, seeded and finely diced
  • honey (optional, but recommended) 

Methods:
  1. Preheat oven to 350 degrees and grease an 8x8 square pan.
  2. Mix together the egg, beer, soy milk, oil, and jalapeños.
  3. Add the cornbread mix and stir just until moistened.
  4. Pour into pan and place in the oven for about 40 minutes.
  5. Drizzle with honey and enjoy!


Friday, May 18, 2012

Nopales, ya'll


This was going to happen eventually. One of my absolute favorite things about living in the Bay Area is all the wonderful produce, and something I have been eyeing for a while is nopales (cactus). I have enjoyed it in a few burritos in Berkeley, and my tastebuds fancied it so. When I came across these tacos, I immediately knew the fate of the nopale cactus that was soon to make it's way into my belly (by way of some panko breadcrumbs, the oven, and avocado cream).  


Now I'm sure many of you are reading this saying, "but what does cactus taste like, and why would I want to put it on a taco?" Good question. I'm not 100% sure how to describe it, but it is a little bit sour, it has a nice snap to it when you bite it, and has notes of green bean and zucchini and okra? And why wouldn't you want to put it on a taco? Tacos are delicious! These tacos, specifically, are particularly delicious. I love these La Tortilla Factory homestyle corn tortillas, then the cactus is super crunchy, and then it snaps, and then it is smooth on the inside, plus the cooling avocado cream and the crunchy cabbage. These are a huge winner, and I am craving them hardcore while typing this up. Unfortunately, the leftovers are in my fridge, and I am not currently home. Fortunately, the leftovers are waiting for me at home :-).


I used one cactus paddle in this recipe, and have one more in the fridge that I am excited to play with. Perhaps it will adorn some sort of salad, or make it's way into a breakfast taquito, or perhaps I will stuff it?! Either way, i'm pumped.

Nopales Tacos
Adapted from Munchin With Munchkin
Materials:
  • 1 nopale cactus paddle
  • 6 tablespoons cashew cream
  • 3 tablespoons flour
  • 1 cup panko bread crumbs 
  • 1/4 teaspoon cumin
  • 1/4 teaspoon cayenne
  • 1 avocado
  • 2 tablespoons cashew cream
  • 2 tablespoons nayonaise
  • juice from 1 lime
  • 1 clove garlic
  • salt and pepper
  • Red cabbage, sliced
  • Corn tortillas
Methods:
  1. Preheat the oven to 375F.
  2. Clean the thorns off of the cactus and slice into roughly 1/2 inch by 4 inch strips.
  3. Set up a breading station in 3 shallow bowls:
    1. Cashew cream
    2. Flour, with a few shakes of salt and pepper
    3. Panko bread crumbs with cumin and cayenne
  4. Bring the cactus through the breading station in the following order: cashew cream, flour, cashew cream, and finally bread crumbs.
  5. Once breaded, transfer to oiled baking sheet and place in the oven for 20 minutes, flipping halfway through. 
  6. While the nopales are baking, prepare the avocado cream by placing the avocado, cashew cream, nayonaise, lime juice, and garlic in a blender and blend until smooth and then add salt and pepper to taste.
  7. Assemble the tacos with the cactus, cabbage, and drizzle with the avocado cream (I threw on some tomatoes as an after thought too).
  8. Enjoy!

Thursday, May 17, 2012

Warm New England Love

I'm not going to lie, the California weather definitely factored into my decision to move out here. I didn't miss the snow this past winter one bit (although Boston temperatures this past winter rivaled the Bay Area). That being said, I am, and always will be, a New England girl at heart. And you know what? Nothing beats a warm New England spring day.

Rockport, MA: Weather? Warm and sunny. Transportation? Motorcycle. Company? The best :-).
I have been a bit quiet on here this past week (my apologies), and it is because I was off enjoying some of that warm (dare I say hot) New England weather! I took a long weekend and made the trip home for my niece's 6th birthday and Mother's day. I had the absolute loveliest of weekends! It was 80 and sunny all weekend, I spent one of the days with my niece, got to celebrate Mother's day with my wonderful mama and family, played scrabble with my dad, and went for a glorious motorcycle ride with the boy. I ate plenty of delicious food, from cupcakes to my mom's famous grilled vegetables to tofu dogs in Rockport, and got plenty of loving from my kitties.

Here is my trip home in pictures:
My kitties :-)
My niece (and a little bit of mama) :-)
My nephew (and a little bit of dad and brother) :-)
OK! Onto the food!

My parents miss having their personal chef at home, so I like to cook for them when i'm home. For dinner on Monday, I made mushroom bourguinon, a spring salad, and then I made the following lemon-strawberry muffins (because my dad loves lemon desserts).

This was all a super long intro for what is ultimately a post about muffins. Sorry.

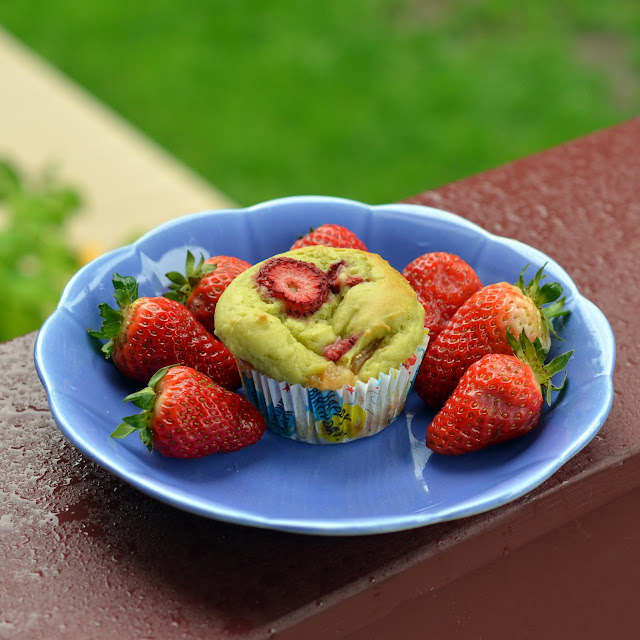
A little disclaimer: while these muffins were gorgeous, fun to make, and pretty tasty... there was something a little bit off about them. I may have slightly under baked them (the tops were starting to brown, but then the inside was still a little mushy). But I can't tell if they were, in fact, under baked, or if it was the fresh strawberries and lemon curd inside that made it seem that way. Either way, the flavor was absolutely delicious, but it was a bit doughy and kind of stuck to your teeth. And I don't like when things stick to my teeth. Also, there is avocado in the recipe, which I was intrigued by, and it worked... but it turned the muffins green. Anyways, I would be interested in trying these muffins again with some changes... because the idea and flavor is definitely a winner (of the chicken dinner variety).

First of all, check out these ingredients:


My lovely mama acted as my hand model :-)
How could they not be delicious?

Lemon-Filled Strawberry Muffins
Materials:
For the lemon curd

  • 3/8 cup non-dairy milk of choice
  • 1/4 cup fresh lemon juice
  • 1 3/4 tablespoon corn starch
  • 1/4 cup sugar
  • 1 teaspoon vanilla
  • 1 teaspoon lemon zest

For the muffins

  • 1 scant cup non-dairy milk
  • 1 avocado, pitted
  • 1/2 cup water
  • 1 teaspoon vanilla
  • 2 1/4 cup all-purpous flour
  • 1/2 cup sugar
  • 1 tablespoon baking powder
  • 1 cup strawberries, sliced
  • 2 tablespoons lemon zest
Methods:
To prepare the lemon curd

  1. Combine all of the ingredients except the lemon zest in a small pot over medium heat.
  2. Stir constantly until the the mixture begins to thicken, maybe 3-5 minutes. 
    • Be careful not to burn!
  3. Remove from heat and stir in lemon zest.
  4. Allow to cool to room temperature for about 5 minutes, and then cover and refrigerate while you prepare the muffins.

To prepare the muffins

  1. Preheat the oven to 400 degrees.
  2. Line muffin pan with paper liners or spray with cooking spray.
  3. Puree the avocado, milk, and water together and then stir in the vanilla.
  4. Mix together the flour, sugar, and baking powder.
  5. Gently mix the wet ingredients into the dry.
  6. Fold in the strawberries and lemon zest.
  7. To assemble the muffins, fill the muffins tins as follows:
    • 1 scoop of muffin batter
    • 1 dollop of lemon curd
    • 1 scoop of muffin batter
  8. Bake for 20-25 minutes.
  9. Enjoy!

Wednesday, May 9, 2012

Spring salad

I enjoy salads as much as the next vegetarian, I suppose.


No, scratch that... I enjoy salads less than the average vegetarian (who I made up for the purpose of this argument). It isn't so much that I dislike the idea of a salad, or raw vegetables... it's just that salads are usually so uninspired. As in, if we are defining salad as "a bowl of raw vegetables tossed in oil and vinegar," then count me in. But, if we are talking "bowl of limp iceberg lettuce with some hard tomatoes on top," then count me out. Far out. As you can see, my issue is that most of the bowl is taken up by lettuce. I have nothing against lettuce... but I would rather have the space taken up by other vegetables. Everyone's favorite parts of a salad are the dressing and the toppings, anyways, right? So why not make a salad that is ONLY toppings?

The few years post college, I started doing just that. My idea of a salad was garden fresh tomatoes (my mom is a prolific tomato grower in the summer), cucumber, fresh corn, avocado, red onion, and Ken's steakhouse italian dressing (yes, that is my favorite dressing and can be added to my odd list of favorites under fake maple syrup and above barbecue sauce). Delicious! So whenever I see a salad that is sans lettuce, it peaks my interest... which is exactly what this salad did. I made it for dinner one night last week and it was AMAZING. My word, it is so refreshing and flavorful. It has a super light dressing, but then the salad almost dresses itself as the tangerines burst in your mouth with every bite.


Well this weekend, when I was craving an equally refreshing salad (it has been pretty hot here lately), but had none of the ingredients left, I threw the following salad together. I had bought some radishes and asparagus, and knew I wanted to do something raw with the asparagus. And a little birdie once told me that radishes are delicious (but not as delicious as soup). AND I had a grapefruit that needed to be eaten. So it looked like I was on my way to a pretty delicious salad. And I was right (said with M emphasis)! It is crispy and crunchy and tangy and smooth. The radishes do their thing, and then the asparagus does its thang for the rest of the day. Lovely, just lovely.


Asparagus and Radish Spring Salad
Materials:
  • 1/2 bunch radishes
  • a few spears of asparagus
  • 1/2 can chickpeas, drained and rinsed
  • 1 grapefruit, supremed 
  • 1/2 cup snap peas, halved
  • 1 tablespoon fresh mint, chopped
  • 1 tablespoon fresh basil, chopped
  • 1 tablespoon olive oil
  • 1 tablespoon white wine vinegar
  • salt and pepper

Methods:
  1. Slice the radishes and asparagus thinly using a mandolin.
  2. I cut the asparagus crosswise into medallions, but feel free to try ribbons if that is what you prefer.
  3. Toss everything together and season with salt and pepper.
  4. Enjoy!


Monday, May 7, 2012

Banana Bread

I usually love to fancy stuff up, cram as much health into my meals as possible, and put together new flavors. Not today though. Today we are doing straight up banana bread. None of this rum or chocolate business. I'm not sneaking vegetables into it (why must you put vegetables on EVERYTHING?!). Just super moist, delicious, bananaey banana bread.

By the looks of those bananas, we may have another loaf of banana bread in a few days.
While I am modern in many ways (I mean, I did move across the country to peruse a PhD in science),  I really am a traditionalist at heart. I believe in soul mates and happily ever after. I believe in family coming first. I believe in gender roles, like being in the kitchen while the boy tends the fire in the wood stove. I believe in having my nails done and wearing pearls while cleaning. And I believe in this banana bread. This is another one of my mom's recipes. It is simple and never fails. This banana bread is everything banana bread should be, uber moist and just chock full of banana goodness. I don't recommend tampering with this recipe at all, for it is perfect as is.


I should also note that this loaf of banana bread lasted maybe a couple of hours in my house. I don't think anyone was capable of just having one slice. In fact, I think macho M had about 7 slices. He is a beast like that. I should also note that this recipe has been rat approved. Gus Gus and Bianca went crazy licking out the bowl when I was done (gross. yuck).


Banana Bread
Materials:
  • 1 1/2 cups all purpose flour
  • 1 1/2 teaspoon baking powder
  • 1/4 teaspoon baking soda
  • 1 teaspoon cinnamon
  • 1/2 teaspoon salt
  • 1 cup mashed bananas
  • 3/4 cup sugar
  • 1 cup oil
  • 1 flax egg (1 tablespoon ground flax + 3 tablespoons water)
  • 1/2 cup walnuts, chopped

Methods:
  1. Preheat the oven to 350 degrees and grease loaf pan.
  2. Mix together the flour, baking powder, baking soda, cinnamon, and salt.
  3. In another bowl, mix together the bananas, sugar, oil, and egg.
  4. Add the wet ingredients to the dry and stir just until moist.
  5. Gently fold in the walnuts.
  6. Pour into load pan.
  7. Bake for about 50 minutes to 1 hour (depending on your oven), or until a tooth pick inserted into the center comes out clean. 


Thursday, May 3, 2012

Obligatory Cinco de Mayo post

Seriously though, who doesn't love Cinco de Mayo at least a little bit? An excuse to eat Mexican food and drink Margs? Deal. In fact, in college, my roommates and I were so fond of Cinco de Mayo, that we also celebrated Doce de Mayo, so we had an excuse to do it all over again the following weekend (a decision I think some of us were regretting the following morning).


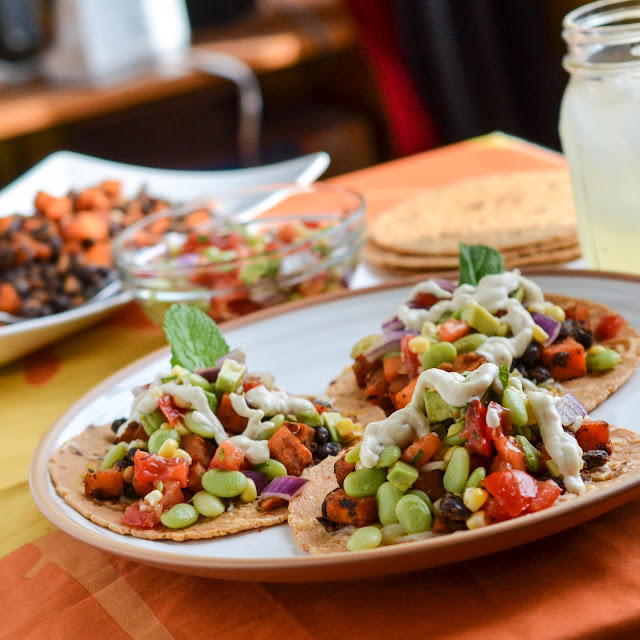
I haven't quite decided how I am going to spend it this year, but I know it started with these tacos. And that it is going to continue with burritos and street beers (Tecate, of course) for lunch tomorrow, per the request of a dear Mexican friend of mine. And these tacos were so good, that it might end with them as well. And since they are filled with only good things, I can eat them to my hearts content!


And then complain about how full I am... :-/

Filled with nutrients, that is! As luck would have it (well there is nothing lucky about it, nature knows exactly what its doing), sweet potatoes are actually the bomb diggity. One of the bomb diggityest, I would dare to say. Let's work through it. First you see the sweet potato, and how orange it is... that right there is a good sign (the more colorful your vegetable, the better). Underneath that pleasing orange hue resides a great store of vitamin A, which helps your body regulate an innumerable list of important processes (a lab in my department has studied this extensively). Everyone knows how good vitamin A is for your eyes, but it is so much more than that! It literally helps your brain function. Mice that have a vitamin A deficiency are, to use a scientific term, dumb. They have trouble learning, orienting themselves, etc. Oh, and they are overweight too. Now, once your body takes up all the vitamins and cofactors, it is left with fiber, that then goes into the gastrointestinal track to act as fertilizer for your gut micro biome, the forgotten organ that you want to keep happy... but more on that another day.


So put down those french fries, and give the sweet potato a try! Preferably delivered to your mouth in these delicious tacos topped with a fresh mexican succotash (do people even eat succotash anymore?!) :-)

Happy Cinco de Mayo!


Sweet Potato Tacos
Materials:
For the tacos
  • olive oil
  • 1 tablespoon fresh ginger, minced
  • 2 cloves garlic, crushed
  • 1 1/2 tablespoons taco seasoning
  • 1 sweet potato, diced
  • 1 can black beans, drained and rinsed

For the succotash
  • 1 cup lima beans, cooked
  • kernels from 1 ear corn
  • 2 tomatoes, diced
  • juice from 1 lemon (or lime)
  • 1/2 red onion, diced
  • 1/2 avocado, diced
  • 2 tablespoon fresh mint, minced
  • salt and pepper to taste

Methods:
  1. Heat up some olive oil in medium nonstick skillet over medium-high heat.
  2. Add the ginger and garlic and sauté for about 1 minute.
  3. Add the taco seasoning and cook for additional minute.
  4. Add the sweet potato and cook for about 10 minutes, stirring occasionally.
  5. Stir in the black beans and cook for additional 5 minutes, until the sweet potato is fully cooked.
  6. In the meantime, toss together all the ingredients for the succotash.
  7. To assemble: briefly heat tortilla either in microwave for 30 seconds or in dry skillet, top with sweet potato and beans, and spoon on succotash.
  8. Enjoy!
    • May a suggest with a side of margarita?


Tuesday, May 1, 2012

Weeknight fancy: mushroom bourguinonne

I love when cleaning out the fridge turns into a gourmet meal. I had some mushrooms that were on their way out, some leftover red wine from a recent party, and some fresh rosemary I wanted to finish up. I immediately thought of making mushroom bourguinonne. This is a recipe that I learned at a cooking class that I took a few years back. It really is a simple recipe, made with simple ingredients, that moonlights as gourmet french food.


So even though I may have had this gorgeous meal in front of me, I made it will still sweaty from the gym, and ate it cross-legged on the couch while catching up on this past season of Bones.


Let's get back to the mushrooms for a second though. Why would you make beef bourguinonne, when you can make mushroom bourguinonne? As the beef stews, it is breaking down into all sorts of carcinogenic compounds (heterocyclic amines) that are going to go into your body and wreak havoc. Particularly in your colon. Mushrooms are going to do the exact opposite. Recently, a study conducted in China concluded that woman who included mushrooms regularly in their diet had a 64% reduced risk of developing breast cancer. And those that also drank green tea? A 90% reduction! Both mushroom polysaccharides and green tea polyphenols act as scavengers to go through your body, soaking up any harmful compounds that may be in there. The key here is that these naturally bioavailable compounds can go in, do their thing, and then are automatically excreted from the body, taking with them the bad guys.

In addition to mushrooms being good for you, there are currently some great varieties of mushrooms in season! Please head over to Delectable Musings for some other great seasonal eats :-)!

Pretty cool, huh? So put on a tea pot of green tea, and get to chopping those mushrooms!


Mushroom Bourguinonne
Materials:
  • olive oil
  • 2 yellow onions, chopped
  • 2 lbs mixed mushrooms, quartered
  • 4 cloves garlic, thinly sliced
  • 1/4 all purpose flour
  • 2 1/2 cups dry red wine
  • 1/4 cup soy sauce
  • 1 tablespoon fresh rosemary, minced
  • 1 tablespoon honey
  • 2 tablespoon balsamic vinegar
  • salt
  • pepper
  • parsley to serve
  • quinoa pasta

Methods:
  1. Heat up a oil in a large skillet over medium-high heat.
  2. Saute the onions until just translucent, about 5 minutes.
  3. Add the mushrooms and garlic and cook until the mushrooms begin to release their juice, about 5 more minutes.
  4. Sprinkle with the flour and cook for 1-2 minutes.
  5. Pour the red wine in and stir well.
  6. Add the soy sauce, rosemary, honey, and vinegar and stir.
  7. Cover, reduce heat to medium-low, and simmer until the sauce has reduced and thickened, about 15 minutes.
  8. Salt and pepper to taste.
  9. In the meantime, cook your pasta accordingly.
  10. Serve mushrooms over pasta, garnish with parsley.
  11. Enjoy!
    • Sit back, relax, and let the mushrooms do the work now!


I'll put this sauce on everything

My loveliest of loves had a small gathering at her place this past weekend. I eagerly offered to bring some delectable bites upon receiving the invite. I offered with the highest of aspirations and the best of intentions. I set to looking through my fancy cookbooks and selected barley risotto cakes with a smoked onion-chipotle sauce. Yum.

Long story short? It was a disaster. Seven pm rolled around and I had this soupy messy of al dente barley, that laughed at the thought of being formed into a ball. Luckily I had also made cookies (rosemary shortbread cookies, which you will be seeing soon), so I didn't feel too bad abandoning the risotto balls.


Heres the deal though: I had already made the smoked onion-chipotle sauce, which was like fiery angels dancing on my tongue. Legit, my roommates and I were gathered around the bowl with spoons and dumb smiles on our faces. Except for resplendent R, who hates eating spicy foods after napping. I was so excited to share it, and it really saddened me to pour it into a tupperwear container and store it in the fridge while I went galavanting.


But alas, the plot thickens. Turns out this is the most delicious sauce and it can be put on anything. Or eaten by the spoonful. Whatever. Sunday evening, it made its way onto some pizza, per the suggestion of nebulous N. A sweet potato and kale pizza, to be exact. More to be said on that later.

My suggestion? Go make this sauce. Then figure out what you are going to do with it. It is like a cross between tomato sauce, salsa, and barbecue sauce. And anyone who knows me knows my feelings on barbecue sauce. I could spend at least 30 minutes proclaiming my love of and strange habits with barbecue sauce, but that isn't a digression we are going to take now. So basically, you could use this sauce on anything that calls for any of the above. I can also imagine that it freezes well, so having a baggy or two of this in the freezer seems like a good idea to me.  


Smoked Onion-Chipotle Sauce
Adapted from The Millennium Cookbook
Materials:
  • 1 tablespoon canola oil
  • 2 red onions, smoked and sliced (or 2 onions, sliced + 2 teaspoons liquid smoke)
  • 1/4 dry red wine
  • 1 teaspoon cumin
  • 1 teaspoon oregano
  • 2 tablespoons honey
  • 1 tablespoon balsamic vinegar 
  • 2 cups fresh or canned crushed tomatoes
  • 1/4 cup canned chipotles in adobo
  • 1 cup vegetable stock
  • 2 teaspoons salt

Methods:
  1. Saute the onions in the canola oil and red wine over medium heat for about 12 minutes.
  2. Add the cumin and oregano and sauté for 2 additional minutes.
  3. Add the honey, vinegar, tomatoes, chipotle, stock, and salt and simmer for about 15 minutes.
  4. Carefully transfer to blender (in batches) and blend until smooth.
  5. Enjoy immensely!


ShareThis